Streamlining Application Deployment with AWS S3, CloudFront and Route 53
- Published May 15, 2024
In the ever-evolving landscape of web development, efficiency and scalability are paramount. Amazon Web Services (AWS) offers a powerful trio to achieve these goals: Amazon S3 (Simple Storage Service) for reliable storage, Amazon CloudFront for lightning-fast content delivery, and Amazon Route 53 for robust DNS management. In this blog post, we'll explore how to leverage these services to deploy your application seamlessly, optimize its performance, and manage your DNS effectively with Route 53.
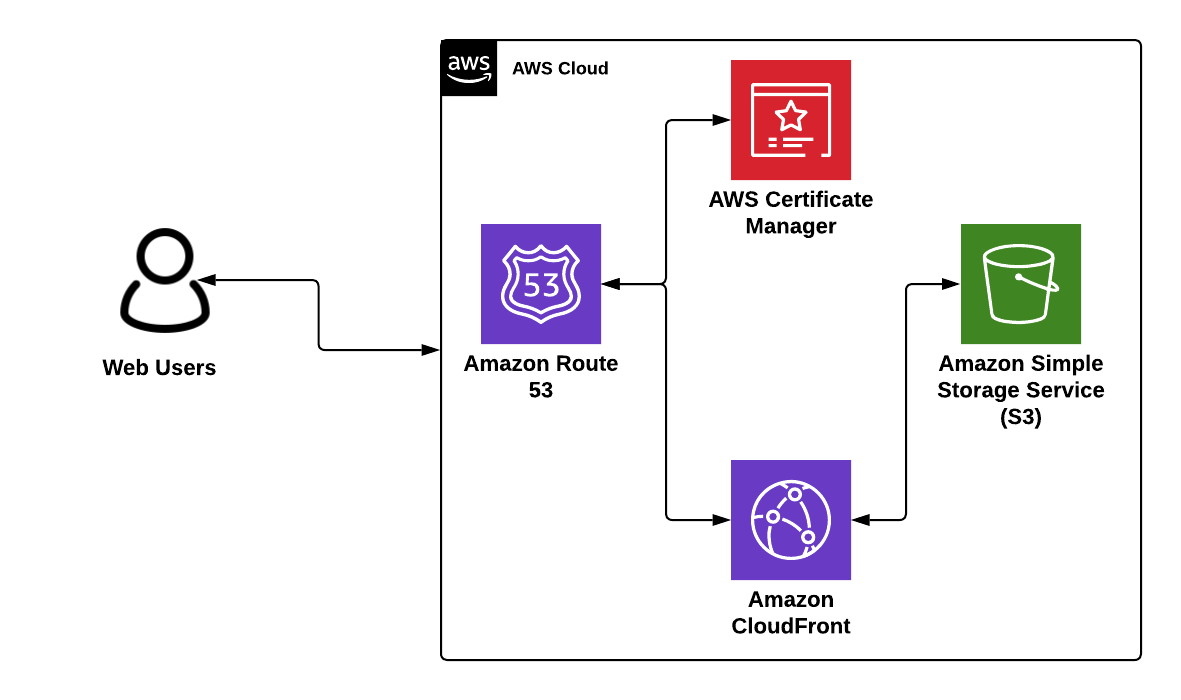
Architecture diagram
What is Amazon S3?
Amazon Simple Storage Service (S3) is a scalable object storage service that allows users to store and retrieve any amount of data at any time. It's designed to deliver durability and is used for a variety of purposes, including storing static web content like HTML, CSS, JavaScript, and media files.
Key Features of S3:
- Scalability: Automatically scales to meet your storage needs.
- Durability and Availability: Ensures high durability and availability of your data.
- Cost-Effective: Pay only for what you use, with no minimum fees.
What is Amazon CloudFront?
Amazon CloudFront is a content delivery network (CDN) that speeds up the distribution of your web content by serving it through a global network of edge locations. Requests for your content are automatically routed to the nearest edge location, ensuring low latency and high transfer speeds.
Key Features of CloudFront:
- Global Reach: Delivers your content with low latency across the globe.
- Security: Integrated with AWS Shield for DDoS protection, and supports SSL/TLS encryption.
- Cost Efficiency: Pay-as-you-go pricing model.
What is Amazon Route 53?
Amazon Route 53 is a highly available and scalable Domain Name System (DNS) web service. It translates domain names (like www.example.com) into IP addresses (like 192.0.2.1) that computers use to connect to each other.
Key Features of Route 53:
- Reliability: Designed for high availability and reliability.
- Ease of Use: Easy to manage DNS settings through a web-based interface.
- Integration: Works seamlessly with other AWS services.
Deploying an App to S3
Step 1: Prepare Your Application
Ensure that your application is properly configured for deployment. This may involve optimizing assets, configuring build scripts, and setting up any necessary dependencies.
Step 2: Create an S3 Bucket
Navigate to the AWS Management Console and create a new S3 bucket. Choose a globally unique bucket name and configure the appropriate permissions to allow public access to your files if necessary.
Step 3: Upload Your Files
Upload your application files to the S3 bucket using the AWS Management Console, the AWS Command Line Interface (CLI), or a third-party tool. Make sure to organize your files into appropriate directories, such as /css, /js, and /images.
Step 4: Enable Static Website Hosting
Enable static website hosting for your S3 bucket and specify the index document (e.g., index.html) and error document (e.g., error.html) for your application.
Step 5: Test Your Deployment
Verify that your application is accessible by visiting the S3 bucket's website endpoint URL in a web browser. Ensure that all assets load correctly and that your application functions as expected.
Integrating CloudFront for Improved Performance
Step 6: Create a CloudFront Distribution
Navigate to the CloudFront console and create a new distribution. Choose your S3 bucket as the origin and configure additional settings such as caching behavior, origin access identity, and SSL certificate.
Securing Your Application with ACM
Step 7: Request an SSL/TLS Certificate with ACM
In the AWS Management Console, navigate to AWS Certificate Manager and request a public certificate for your domain. Follow the prompts to validate domain ownership, typically via email validation or DNS validation using Route 53.
Step 8: Attach the Certificate to Your CloudFront Distribution
Once the certificate is issued, go back to your CloudFront distribution settings and configure the distribution to use the newly issued ACM certificate for SSL/TLS termination.
Configuring Route 53 for DNS Management
Step 9: Configure Route 53 DNS
Update your DNS records in Route 53 to point to the CloudFront distribution's domain name. This allows users to access your application through the CloudFront CDN, benefiting from improved performance and scalability. Route 53 offers advanced routing features like latency-based routing, geolocation routing, and health checks to further optimize your application’s availability and performance.
Final Testing and Monitoring
Step 10: Test and Monitor
Test your application again to ensure that it is being served through CloudFront and that the DNS settings are correctly configured in Route 53. Also, verify that the SSL/TLS certificate is properly applied and that your website is accessible via HTTPS. Monitor CloudFront, ACM, and Route 53 metrics and logs to gain insights into your application's performance and usage patterns.
Conclusion
Harnessing the combined capabilities of Amazon S3, CloudFront, and Route 53 allows for seamless application deployment, providing users globally with a fast, dependable, and scalable experience. Whether you're deploying a static website, a single-page application, or a more complex web application, AWS equips you with the necessary tools to thrive in today's digital environment. Utilizing S3 for storage, CloudFront for content delivery, and Route 53 for DNS management simplifies the deployment process, enhances performance, and lets you concentrate on creating exceptional web experiences for your users.